Luminar Update Easily Handles Tough Fuji and Sony Files
Luminar has a new update and it’s fast! Although I published an extensive review of raw processors six weeks ago that included Luminar 2018 v1.1 their new update called Jupiter (v1.2) has significant changes and improvements. I believe it warrants an updated review covering the important changes. So here it is. [For my previous review click here]
Bottom line first
The most significant and useable improvement in this version is speed! I used two very challenging raw file types to try out the advance copy provided to me by Skylum: Fuji X-Trans raw files which use a sensor pattern that requires special processing and Sony 42MP raw files which are a challenge due to their sheer size. Luminar Jupiter handles them easily and quickly. Keep in mind I’ve been using a pre-release build so it’s possible the official release version may do even better.
The Luminar “Jupiter” upgrade for existing users of Luminar 2018 is free so that’s a no brainer (Luminar menu >Check for Updates…) If you’re new to Luminar or upgrading from pre-2018 versions I believe it’s still worth it. I’ve advocated this program for a long time because it’s so intuitive and enjoyable to use, not to mention pretty inexpensive. And with this upgrade it just got better. You can upgrade for $39/€39/£34 (use coupon code WOLFSON for these prices) and new users can buy it for $59/€59/£55 (use coupon code WOLFSON) There are a host of useful freebies included as well that Skylum values at $202.
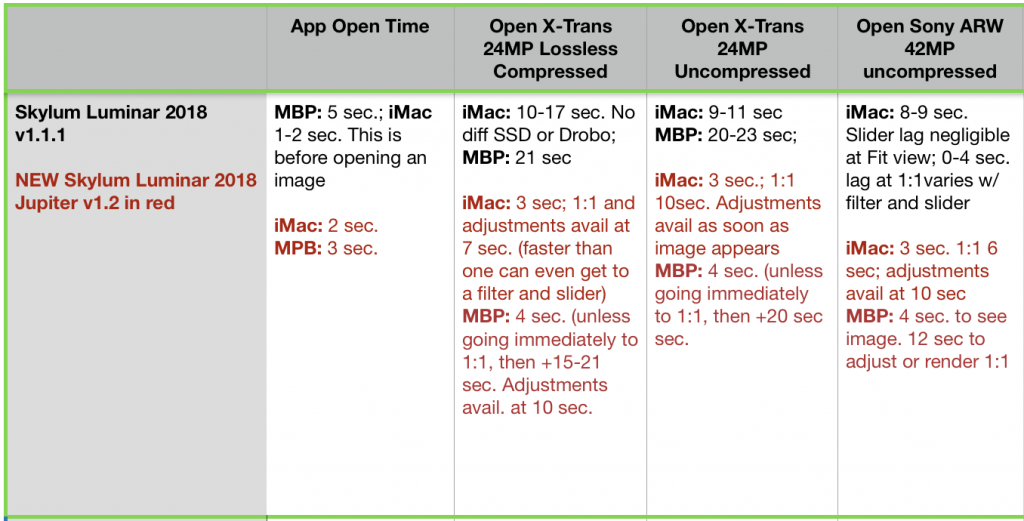
Raw images open dramatically faster. I really noticed this on my 2014 MacBook Pro laptop which has average specs by today’s standards. Previously it took 21-23 sec. for a Fuji X-Trans RAF file to open. Now it’s 4-5 seconds to see the image and about 10 seconds total before sliders have an effect. Sony 42MP raw files are even faster. All of this is fast enough that you barely have time to find the slider you need before the sliders are already active. You will still see the “Processing” wheel in the lower left corner continue for an additional 15 sec or so after the image is visible but the only aspect it affects is immediately zooming to 1:1. In this case you will wait 17-20 sec. for the image to fully render at 1:1. Remember we’re talking an average laptop here, nothing fancy. This is a huge improvement in efficiency and in my opinion, enjoyment too. I don’t have to wait 20+ seconds just for the image to open and I can start doing my initial raw adjustments right away.
On my faster desktop machine (2017 iMac Retina 5K with 4.2 GHz Intel Core i7 with 32 GB RAM and GPU is Radeon Pro 580 8GB) there are commensurate improvements but they are less important as Luminar was plenty fast on my desktop in the previous version.
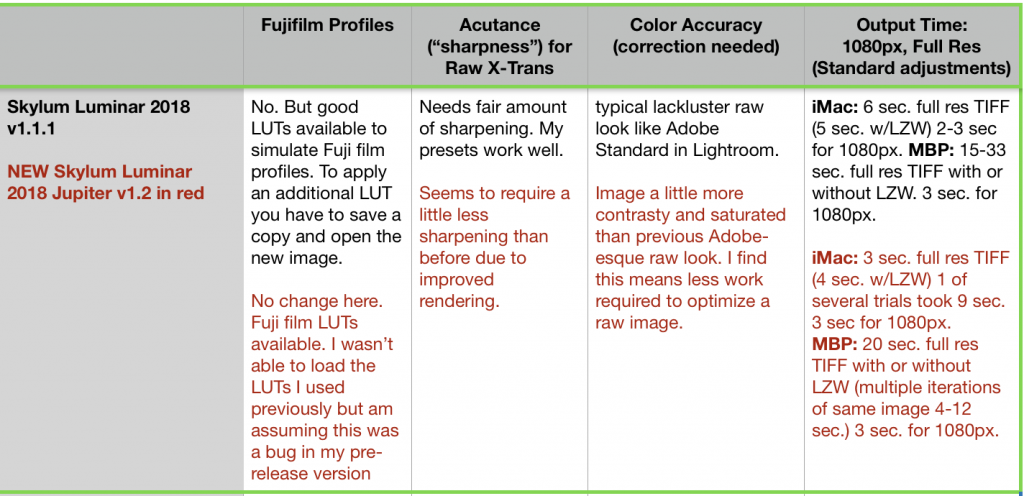
Export speeds have also been improved. See my chart further down. You can compare the numbers to other processors in my previous review.
Windows users will see more parity with the Mac version than before including batch processing, free transform feature, faster export, editing speed, full screen preview, and localization/language updates.
“Automatic” lens distortion and chromatic aberration (CA) corrections
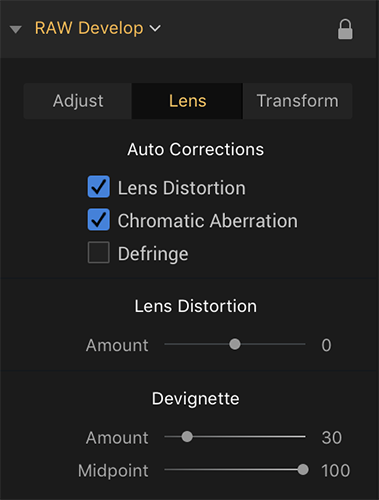
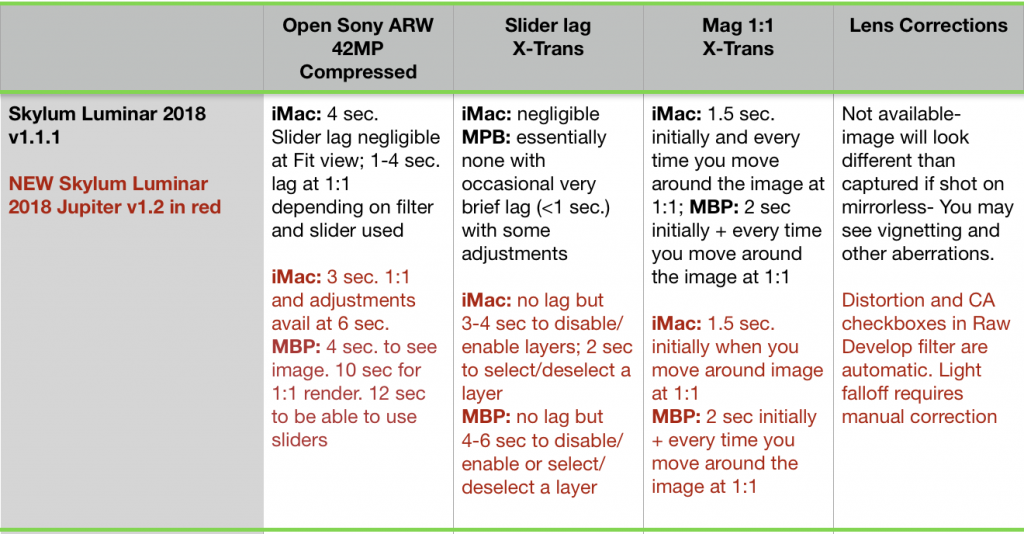
The not so automatic corrections are a welcome improvement but really a stepping stone to full implementation of automatic lens correction. Luminar 1.2 fixes lens distortion and CA by clicking check boxes in the Raw Develop filter under the Lens tab. There is no apparent way to manually adjust fringing. Currently automatic correction of light falloff (some call this vignetting) is not implemented. There are two tools available to correct light falloff: Devignette sliders under the Raw Develop Lens tab and the Vignetting filter.
Some lenses have light falloff that is difficult to correct properly with the Devignetting or Vignette filter. One of my test images I use I shot with the ubiquitous Fujinon XF 18-55mm lens which can yield very dark areas in the extreme corners. I have also seen this type of falloff in other companies’ lenses as well. The distortion button, which ends up cropping the image as part of fixing the distortion goes a long way to eliminating the dark spots but there are still remnants. In some images you could clone this out but this is time consuming, especially if you have a lot of images from the same lens with this issue. Whether good or bad, lens manufacturers are assuming automatic lens correction when designing new lenses, particularly those for mirrorless cameras.
Although the click boxes for distortion and chromatic aberration certainly help, it still entails extra steps. I will be much happier when light falloff correction is added with an option to have all three types of correction implemented on the fly (i.e. full automatic correction) with an option to disable it for DSLR users that may want to retain what they saw in the viewfinder, distortion and all.
Image quality
I really had no problems with the image quality in the previous version but Skylum states “Enhanced image quality on image view” is one of the improvements. I did notice, however, that the initial image is better than before. By “better” I mean less flat with slightly more contrast and slightly more vivid color and overall a sharper appearance. From what I can gather the rendering is just more refined at any magnification. Previously it looked exactly like the Adobe Standard which is pretty blah and we have come to accept that as the “look” of a raw image. I often say raw is blah.


There is actually a good reason for the flat look of raw images, in that if your image is contrasty and saturated at the onset you have probably sacrificed some subtle detail in highlights and shadows and nuances of variations in hue and tone. I saw a similarly improved version previously with ON1 Photo Raw. Initially I was a little taken aback with the changes to ON1’s rendering in this regard and then realized that nothing was lost and it is just less work to get a raw file back to a starting point that is more like the original scene. Furthermore, even Adobe offers variations of their standard profile via Camera Calibration which offers different looks/starting points. Of course if employ major manipulation then these subtleties are a moot point.
Comparison Chart
Below I’ve included my tests of the previous version of Luminar for comparison. Note that the results for updated version 1.2 of Luminar (Jupiter) are in red. I’ve evaluated the factors that are important to everyday editing, particularly Fuji X-Trans files along with Sony ARW 42MP files, both of which are a challenge to any processor. For timing I used a digital stopwatch and did numerous runs of each test.
Favorite touches
There are some not-so-obvious but nice features. Some of these are new with this version and a few were implemented previously. They are:
• F key shortcut for full screen preview
• Cmd-L to see/hide filters
• Ability to see just your favorite filters (selectable) or other categories
• Ability to save custom workspaces
• Separate opacity slider for each layer and ability to rename layers
Conclusion
The speed increases alone in Luminar “Jupiter” version 1.2 make it well worth the update/upgrade. The only real shortcoming was just my wish that Skylum would have incorporated full automatic lens corrections instead of the checkboxes. I’m sure we’ll see it soon and one needs to consider the many pluses. The speed increase is impressive and useful. Most importantly I think it also leads to an increase in enjoyment as you can start using that lovely interface right away when opening raw files- even those pesky Fuji X-Trans raw files.
Joel Wolfson is an internationally published photographer who loves teaching as much as shooting. He shares his 30 years of experience as a working pro with other photographers and enthusiasts by way of his workshops, 1 on 1 training, webinars, articles, blog and speaking engagements. His technical articles have been translated for use in more than 30 countries yet he is best known for his artistic images of nature’s fleeting moments and unexpected views of everyday places around the globe. He is one of the pioneers of digital photography having conducted digital photography seminars for Apple and other corporations starting in the early 90s. His roster of notable clients includes numerous publications and fortune 500 companies. He currently works with great affiliates like Arizona Highways, Topaz Labs, ON1, and Skylum/Macphun to have more avenues for working with those wanting to pursue their love of photography. His goal is to make learning and improving one’s photography easy, fun and rewarding.
Disclosure about product links and affiliations: Some of the links I provide are affiliate links which means I get a small commission, with no additional cost to you, if you click it and end up buying something. It helps keep the lights on as well as supporting this blog and my other free educational resources and articles. So if you use them, thanks! It is always my goal to report my results in a straighforward manner whether or not it favors a particular product.


Hi Joel, thanks for the nice review. But I still have a burning question. Is there an actual advantage to Luminar that you can’t get with Lightroom? It seems, on my admittedly superficial view and experience with the program, that Luminar is trying to fill a gap here taking the processing of Lightroom and including some of the Photoshop adjustments, all in a single program. I’ve been using LR and PS for many years and am comfortable with them. Luminar seems to be just a new package of processing, which may in fact present a fresh view of things, and so represent some significant value, especially at it’s quite reasonable price. Your thoughts?
PS: I’ll be working in the Grand Canyon for a few weeks in August 2018, would love to stop by your gallery and chat. Where are you located in Flagstaff?
Hi John,
Thanks and I’m glad you liked the review. Here’s my quick(ish) answer: You can do virtually anything in Photoshop but what might be one click in Luminar (or ON1, or Studio, etc.) could be tedious and cumbersome in Photoshop. That is how plug-ins came about and now we are on the next generation of processing with products like Luminar and ON1 Photo Raw that are also non-destructive raw editors. Lightroom is the another part of the equation in that it has image management capabilities- the best image database out there IMO. Unless you’re shooting Fuji X-system which is a special case, then there’s nothing wrong with using Lightroom as your main hub. You can always hop into Luminar, ON1 and others for their unique capabilites. If you didn’t see it already I did a comparison of 4 raw processors including Lightroom (mainly geared towards Fuji and Sony files- both of which pose a challenge for different reasons.)
Hope this helps,
Joel
recently i updated luminar and i assumed that it now becomes luminar jupitar and yet in the above article you talk about an upgrade costing $39 is this something different? . errol
Hi Errol,
Good question. If you own(ed) Luminar 2018 then the update is free. If you own the older Luminar 2017 then you need the upgrade.
Hope this helps.
Cheers,
Joel
i have Luminar 2018 1.2.0 – is this the newest version? The program tells me it is. Is there a difference between Luminar & Luminar Jupiter?
Hi Brian,
Yes 2018 1.2.0 is the newest version. There’s a build number after the version too. If you’re not sure just pull down the Luminar 2018 menu to Check for Updates….
“Jupiter” is just a name given to version 1.2 to distinguish is from previous versions. It’s still Luminar!
Cheers,
Joel
I have not seen any mention if Jupiter uses gpu for processing. If so, a egpu with an older laptop could really increase processing speed.
Thanks
Jeff
Hi Jeff,
Good question. I’m pretty sure it does make use of the GPU as most imaging software does these days. Skylum doesn’t specifically mention the GPU in their system requirements but I’d be surprised if they don’t use it. It’s something you can ask them directly ( https://skylum.com/support ) I will ask them myself too.
Best,
Joel
The thing that I find very difficult about Luminar is that you cannot browse through photos within the Luminar program. Am I right? To use luminar, I usually batch a grouping of photos to JPG, view the photos in Picasa, and then decide which photo I’d like to edit and then open that file, individually, in Luminar. This is very tedious. In other programs, the photo editor allows you to browse your raw files, edit them, go back and forth between edits and then finally convert them to JPG (or whatever) when you’re ready. Is there another way to browse RAW files that’s more efficient within Luminar? Oh, and when the RAW file is being converted, I can’t go to another RAW file (or do anything) until that RAW files finishes being converted.
Hi Mike,
Yes, you’re correct. At the moment Luminar is strictly a one-at-a-time proposition. You can do batch processing but that doesn’t help in terms of browsing. However, browsing and image management are a planned upgrade. We’re supposed to see it this year. Skylum has said they will send me a build when they have it. Right now I don’t know any of the details but I plan to review it when they have it ready. The way I handle it is to do my file preparation in ON1 Photo Raw (free trial here) which has image management capabilities as well as raw processing. I use Luminar for it’s filters that others don’t have. If you haven’t seen it already I did a comparison recently of Luminar, ON1, Lightroom, and Topaz Studio.
All I can say at this time is that we all just have to wait Luminar to implement DAM (“Digital Asset Management”). I think Luminar is too good to give up on…it’s just inconvenient right now if you’re trying to use it as a primary tool.
Happy Shooting,
Joel