Barb is out backpacking in Yosemite scouting for great photo ops so I’m doing this post. I’ll take the opportunity to do a preview of a new plug-in from Topaz Software being released today! It’s called Black & White Effects* and contains a set of tools to take you beyond default black and white conversions in Lightroom or Photoshop. Although you can accomplish the same result in Photoshop and to a lesser extent, Lightroom, this plug-in (as with others from both Topaz and Nik) helps you accomplish the task more efficiently.
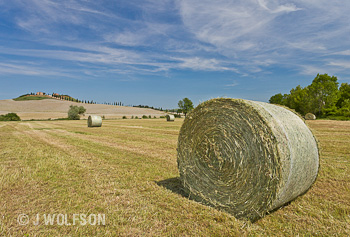
They sent me a beta version which by definition isn’t quite finished but I still tested it out on a live job. The photo I tried it on is a timeless scene I shot in Tuscany while scouting for the workshop I conduct there every year. I tend to think in black and white sepia toning when it comes to a classic scene like this. But I shoot RAW files which are in color and must be converted to black and white. Here’s the photo before I opened it in B&W Effects.
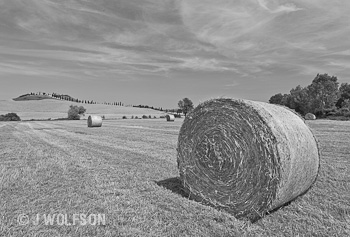
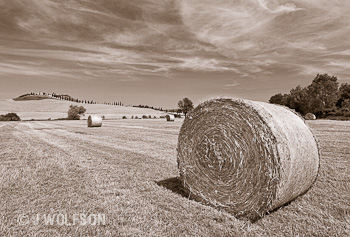
Below is how a default conversion would look using Lightroom or Photoshop (in this case I used Lightroom)- not at all the idea I had in my mind’s eye for a timeless black and white. So, how do I get that timeless feel in a rich sepia toned and dramatic black and white landscape? Well, here’s a typical workflow for me in creating black and white landscapes from RAW files: 1. Make initial adjustments for contrast and color in Lightroom. 2. Use Topaz Adjust to bring up shadow detail while enhancing contrast in the sky. Most of this I do with the Adaptive Exposure sliders 3. Convert to black and white and do all my “tweaks” to optimize tonal values and any film/grain simulations, borders, traditional BW filters such as Yellow or Red, and perhaps toning, all in Nik Silver Efex Pro 4. If required I’ll work on the texture and fine details using Topaz Detail. Enter Topaz B&W Effects. The coolest part of this for me is that I can save a bunch of time by skipping the Topaz Adjust step because most of what I need is built right into B&W Effects, including Adaptive Exposure! For this image I set the slider to .2 with 10 regions. Don’t worry if these settings don’t mean much to you. Once you get your hands on this plug-in they will. B&W Effects also has Detail controls, potentially saving me more time if I don’t have to go into Topaz Detail. I generally try the Detail slider first (both for Topaz Adjust and B&W Effects) to see if it will do the job. If not the Detail plug-in has more comprehensive controls. Next I used a red filter at full strength to darken the blue in the sky- a technique taken from traditional black and white film for more drama in the sky. I should mention here that when I try the equivalent effect in Lightroom, halos appear around the trees in the background. I finalized my image by simulating one of my favorite films, Fuji Neopan Acros, with the Film Grain option. Another final touch was sepia toning the image by adjusting the Tone Strength slider in the Silver and Paper Tone panel. Here’s the final result I had in my mind’s eye:
Conclusion: Topaz B&W Effects is a welcome addition and great complement to my collection of plug-ins for Photoshop and Lightroom. For a first release it is quite robust. I do a fair amount of black and white work so B&W Effects is now part of my arsenal. The key to using the myriad of plug-ins out there is to use them when and where they will save you time or to do a job other tools can’t. That said I won’t give up Nik Silver Efex Pro because no-one else has the equivalent of the control points found in Silver Efex and Viveza.
*Topaz is offering a half price introductory deal. Just click here and when you check out enter the code “bwandbeyond” to get it for 29.99!
Photo Tech notes: I used a Canon 5D Mark II with Canon EF 17-40mm L to shoot the hay bale photo. Software used is noted in the post, processed on a Mac Pro using an Eizo ColorEdge CG243W display.
Hi Joel:
Black and White seems to be a very interesting means of capturing an even more exciting photo. I really like the hay bale photo noted above in Black and White. On my new camera, I noticed it has an option to set it for that. I liked your tip of taking black and white photos on cloudy days. It will be a challenge as I naturally gravitate to very colorful images. Recently, I submitted a series of very colorful photos taken at the Phoenix Art Museum for a ‘Arts and Floral” show a couple of weeks ago. The Florists, designed arrangements to relate to special paintings. The photos I submitted, they liked so much they added them to the Archives at the museum with my contact information. For color enhancement, I only enhance with the Mac Book Pro. I really look forward to your presentation at the Travel Convention, May 3rd. Congratulations to your expanding career with Arizona Highways!!
Thanks
Cindy Loewen