Metadata helps me decide what lenses to buy or get rid of…

Lightroom has a feature that can help you use your photography metadata to make informed lens buying and upgrade decisions. In this case, Lightroom proved to me that I don’t need a 24-70mm lens. I’ll show you how.
Really, why are 24-70mm f2.8 lenses so popular? If you’re a manufacturer I get it: High price, high profit, a limited range makes it easier to design it to perform well and provide a decent maximum aperture, all justifying the high price and profit. But I’ve had these lenses and in practical terms of everyday use, you may as well just have a 24-50mm. With a more limited range it could be faster, probably for the same price or even less, say a 24-50mm f2.5 or maybe even an f2.0. Now that would be a useful lens and a great companion to a 70-200mm or 70-300mm.
It seems the alleged value of the range beyond 50mm is that one could use the 70mm end for portraits. Can you shoot a portrait at 70mm? Sure, but if you’re serious about shooting a portrait aren’t you going to get out your fast 85mm 1.8/1.4/1.2 and make use of a more ideal portrait length and the option of very limited depth of field and a comfortable working distance? Or an even longer lens? If you own a 70-200mm, how often do you use it at 70mm for portraits? Most photographers would agree it’s much nicer around that 85mm-120mm range of the zoom. If you’re not shooting portraits than that 20mm isn’t that important in terms of reach. Perhaps there’s a tiny bit more compression but it’s pretty negligible.
Prove it to yourself
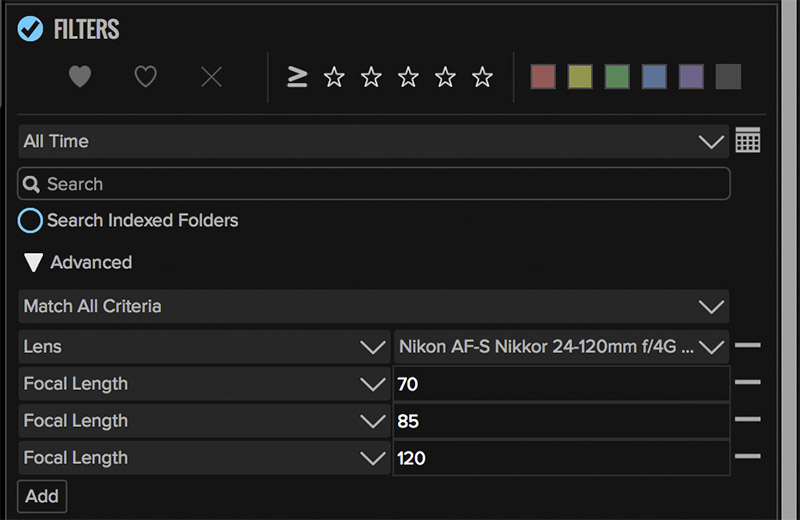
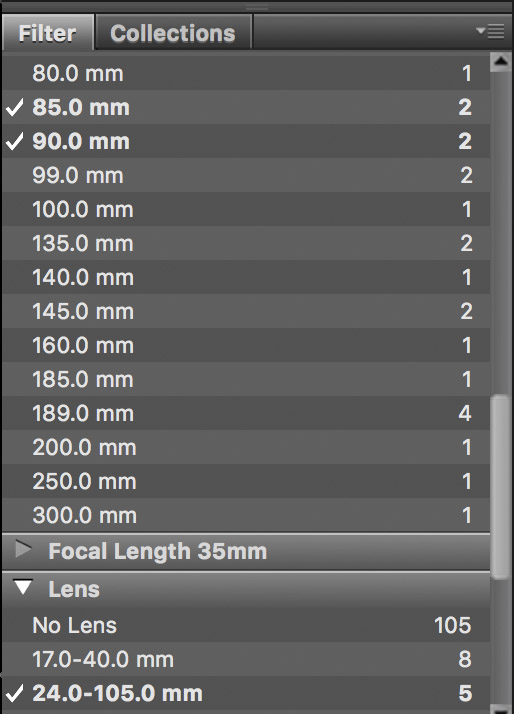
Here’s how to use metadata to prove it to yourself. I think Lightroom works the best for this but it’s still practical enough to do in ON1 Photo Raw or Bridge. I’ll show the steps in Lightroom first:
1. Go into the Lightroom Library module and select an appropriate folder, drive or All Photographs in the Catalog panel. In Grid view (G key or menu View > Grid) bring up the filter bar (use menu View > Show Filter Bar or \ on the keyboard.) If you don’t own Lightroom you can use the Browse module (Filters > Advanced) in ON1 Photo Raw, my current favorite all-round image program or you can use metadata in Adobe Bridge if that’s your cup of tea.

2. As an optional step you can narrow down your image selection into a group that will contain a lot of portraits. You can use keywords, collections or folders depending upon how you have your images organized. Additionally/alternatively you can shift click a bunch of images in the grid view.
3. The two main columns you’ll need are Lens and Focal Length. If your filters are off on the far right side you can use the dropdown and pick Default or Camera Info filter groups. When you hover over the title bar of a column you’ll see a dropdown menu to choose the Lens and Focal Length categories.
Using these two columns, Cmd/Ctl click the focal lengths from a zoom that include a range from 70mm-105mm to see what range you shoot portraits. The number of each you shot is displayed on the right but it’s important to select them so you can see the actual images. I did this with 9000 shots from my Nikon AF-S 24-120mm f4.0. In the 50-75mm range I had no portraits other than a few including at least an upper torso if not full body. The 85mm-105mm range is where most of my portraits reside. The one focal length with the most use for portraits? 85mm. Second place is 105mm. I find a similar correlation looking at the 11,000 images shot on my Sony FE 24-240mm lens.

Bear in mind that while I’m zooming during a shooting session I’m just looking through the viewfinder for the best perspective, not even paying attention to the focal length. In this case the metadata helps me see my most used focal lengths.
The ones I used most for portraits were, not surprisingly, my portrait length primes. They far outnumber (by thousands) those I’ve shot with zoom lenses: 85mm lenses on my full frame cameras or the 56mm 1.2 for my Fuji system which has a full frame equivalent of 85mm.

In addition to the frustration I always felt trying to use the 70mm focal length, Sony, Canon, and Nikon all hover around $2000 for their lenses in the 24-70mm f2.8 category. For the same money you can buy a lens with a more useful zoom range and buy an 85mm prime for portraits. In some cases you’ll even have money left over, especially if you go for the 1.8 on the prime.
For my Sony full frame system I have a 24-240mm zoom and a Zeiss Batis 85mm f1.8. Sigma didn’t have their 24-105mm f4 Art lens in the Sony mount at the time or I may have gotten that one. I had similar setups with Canon (24-105mm f4, 85mm f1.8) and Nikon (24-120mm f4, 85mm f1.8) when I had those systems. I’m not that bothered by the slower aperture for the zooms, especially when I have f1.8 or faster for a portrait length.
I should mention that it’s not entirely fair to compare full frame zooms with crop frame or Micro 4/3 formats. The smaller formats allow lens designers more flexibility. This is why you see lenses on these systems with full frame equivalents going from 24mm to 80 or 85mm and still maintain an aperture of 2.8.
If you have a full frame camera and don’t already own a 24-70mm lens, think twice before you spring for the two grand. Try my method above to help yourself make an informed choice. You may just end up with more useful lenses and some money in your pocket.
Use this for other buying (or selling) decisions too
The 24-70mm f2.8 zoom is just one example. Making use of the metadata you amass over time is great to help you with other lens buying/selling decisions too. Most photographers have at least one zoom lens. When you’re ready to buy a prime lens you can use this method to figure out which one(s) might be the most useful for the way you shoot. Likewise you might see you are using some lenses far less than you thought and this can help you decide what lens(es) to sell. Either way it’s another decision-making tool.
Happy Shooting!
Cheers,
Joel

Joel Wolfson is an internationally published photographer who loves teaching as much as shooting. He shares his 30 years of experience as a working pro with other photographers and enthusiasts by way of his workshops, 1 on 1 training, webinars, articles, blog and speaking engagements. His technical articles have been translated for use in more than 30 countries yet he is best known for his artistic images of nature’s fleeting moments and unexpected views of everyday places around the globe. He is one of the pioneers of digital photography having conducted digital photography seminars for Apple and other corporations starting in the early 90s. His roster of notable clients includes numerous publications and fortune 500 companies. He currently works with great affiliates like Arizona Highways, Topaz Labs, ON1, and Macphun to have more avenues for working with those wanting to pursue their love of photography. His goal is to make learning and improving one’s photography easy, fun and rewarding.
A note about product links and affiliations: Some of the links I provide are affiliate links which means I get a small commission, with no additional cost to you, if you click it and end up buying something. It helps keep the lights on as well as supporting this blog and my other free educational resources and articles. So if you use them, thanks! It is always my goal to report my results in a straighforward manner whether or not it favors a particular product.
Wow, finally some insight in lens selection.
Thanks! I’m glad you found it insightful and I hope others will too.
Cheers,
Joel